Think Different-------> |-| 4 |< 1 N 7 0 s h

Think Different------->    |-| 4 |< 1 N 7 0 s h
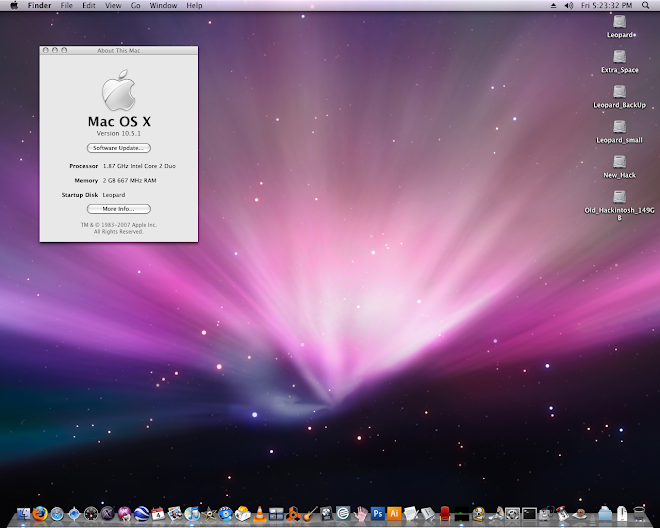
Desktop of ASUS P5W DH Deluxe after apple udate!

Sunday, September 28, 2008

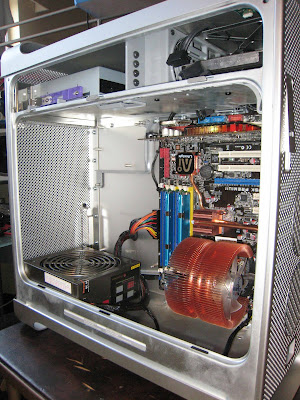
G5 Case with P5K-E Wifi inside


well i learned a whole lot making these g5 case mods. I had never done a computer mod before and it was really fun.

This thing is super quiet and really fast. I put a e8400 c2d 3.0 @ 4.07. I have the whole system cooled with super silent and really nice sounding nexus fans. I have 2 HDDs under the exhaust manifold i nibbled out of scrap sheet metal. The power supply fans keep the hdds cool. I have a geekbench score of 5400 for a c2d!

I got a 36499 open mark test on the 8800 gts. All running vanilla 10.5.5 leopard. Retail install with enablers/disablers and decrypter.

Because of the excellence of these new kexts i was able to update directly from apple without recieving an hpet error or a kernel panic. All just worked!

Amazing work kabyl and all.
Friday, August 8, 2008

first shots inside of day one on G5 case


Well i have just placed my parts inside of the case to see how i can install them. Anythoughts would be great as this is quite a mod for me.

Sunday, May 25, 2008

using the vanilla P5K


I just got this board up and running. I ran into some problems with my p5wdh so asus sent me this as a replacement. I am very happy with the p5k. The only problem is that I didn't get the p5k deluxe or premium as I had requested. So I am playing with this board overclocking my q6600 for the first time. Asus says they will send me something comparable to the p5w dh deluxe.

I got this thing up to 3.17 ghz and my geekbench just cleared 6000. Here is the result

http://browse.geekbench.ca/geekbench2/view/60112

Here is my xbench as well

http://db.xbench.com/merge.xhtml?doc1=290799&doc2=1&setCookie=true

Saturday, March 8, 2008

Update to 10.5.2, with some work


This was a very big update from apple. 10.5.1 is much smaller compared to 10.5.2. Also if you don't run a script or delete the appleIntelCpuPowerManagement.kext you will get a kernel panic. So I followed the Netkas method for updating to 10.5.2. Just search on google for netkas and you'll find what you need. I had to wait to do this as my p5wdh deluxe wouldn't boot for some reason. It took almost a month for Asus to send me a new board. The good news is it was all free! So I now have a perfectly functioning Asus P5WDH Deluxe. I used the Kalyway DVD to install efi on a GUID disk partition. I am running the vanilla kernel and sleep, restart, shutdown, and time machine all work. The only workaround I had to do was plug my keyboard into my front usb port in order to get the P5W to wake from sleep. If I put it in the back usb ports it doens't wake properly(black screens). If I use the power button to wake it, it works just fine.

Also for some reason using the Kalyway install method and the retail DVD cause the sata drives to show up as orange-hot swappable drives. So the fix is here: http://forum.insanelymac.com/index.php?showtopic=83689 and just scroll down and look for --To Get rid of Orange External drive icons while running AHCI-- and download and change these two kexts in the archive zip. They come from the Brazilmac extensions pack.

After a bunch of testing, I think the Kalyway release is the best. I just used the virginizer Kalyway made to reset the preferences of appearance to default settings. I added some things like MenuMeters.prefPane from iATKOS and that was it. By the way I did try the Kalyway 10.5.2 install pkg and I got some minor problems like a 1 and half minutes of black screen before booting. I read somewhere that this might have to do with reloading the NVNJECT.kext, but i just used the Netkas method for upgrading the 10.5.2 from apple and now everything is perfect. So now I can use all of my Pro Apps like Logic and Adobe Creative Suite 3 with no problems.

PS, I also use the Netkas applesmbios.kext because it shows my motherboard properly in the system profiler. I don't like when people hard code a fake name like MacPro. I want the bios to identify everything as close to the real as possible. Also this smbios allows the profiler to show the ram speed, where as some smbios just cause the profiler to report '0' for memory speed.

I think i finally have a perfect Hackintosh! At least for now.

Sunday, January 6, 2008

Just tried iatkos Leopard install DVD


Oh my god, this is the easiest yet. It just gets better and better each day. I had to do zero patching to get my system working! I just selected the proper components for my system and boom I was in a perfect leopard hack desktop.

Girlfriends $500 perfect Hackintosh


Well this was the easiest of them all to install. I couldn't believe it. I owe it all to onetrack for his great guide. I wouldn't have thought to put these particular components together. So when I did and basically just followed the buying guide, then the install guide and it all worked, I was just amazed!

Nothing in the hackintosh world had been that easy for me before. So here is my shopping list. I just have to laugh at the xbench results. This little mother board and entry level processor kicks my asus p5w deluxe with an e6300 ass. I'm sure there's a way to overclock like crazy on the asus but I just wanted to see what the bench marks are at stock settings. For the record the my ibook g3 800 mhz got an xbench score of 12! My G4 digital audio with a dual processor upgrade to 1.6 ghz got 50.
  • Motherboard: Gigabyte GA-945GCM(X)-S2 60.00
  • Processor: Intel core2duo e4500 120.00
  • Graphix: XFX 7300 GS 30.00
  • Memory: A-DATA 2GB (2 x 1GB) / Speed DDR2 800 (PC2 6400) 30.00
  • Power Supply: Thermaltake W0100RU ATX 12V 2.0 500W Power Supply 60.00
  • Hard Drive: 2X250 GB Sata Seagate Barracuda ST3250410AS 70.00
  • DVD Drive: Pioneer DVR-212D 18xSpeed 30.00
  • Case: Raidmax ATX-308 White 25.00
  • Firewire: PCI firewire card SYBA 10.00
Total before tax and shipping after some rebates about 435. Came out to around 500 with shipping and tax. Xbench was 179 without disk checked and 135 with it checked. I'll post a link to the actual results when I go over to Julie's.

Everything works on this: sleep/wake using power button or usb keyboard, restart/shutdown, and software update via apple because of the use of the stock kernel since we're using efi emulation.

Friday, January 4, 2008

Leopard install on Asus P5W DH Deluxe(PC Hardware)


This was a lot harder than installing Tiger. But it is so much more like a mac now! Ever since the implementation of Netkas' EFI, osx86 has not been the same. I can now download System updates like 10.5.1 straight from the Apple software update. I don't have to worry about patched kernels anymore.

My Tiger install was running just fine. But because Leopard's new I had to try it. I didn't even want to begin installing Leopard because I knew it was going to be very involved in the early phases before one step installer dvds were out.

And I was right.
I tried installing just about every single release of Leopard install method out there. Each one had its benefits but I didn't feel like I was using a real mac yet. There were a lot things not working. Also some hackers were putting there own folders and applications in the install. This is a good idea in theory, but I really don't want to have someone stepping on my Mac experience. Thanks but no thanks. So it was off to retrying other install methods that were more difficult but didn't change the Mac OS at all.

The up side is I am so glad I did all of the experimenting I did. If I would have just used someones installer dvd I would not have learned everything I did. I learned which kexts do what and when the system would start to feel like a real mac. Add one too many kexts and I would loose something important, don't add enough kexts and my hard drives would turn orange like external drives. So if you have time to learn how computers work, like I just happened to have since there is writers strike in Hollywood, maybe you live in Mom's basement and don't have to worry about work, then go for it and do it self! If not just download a prepatched dvd and check the appropriate features for your computer setup.

The method I ended up using was the BrazilMac prepatching of the retail dmg of Leopard. I had to add a few things to my kext folder for my video card. I ended up using I_am...me's post patch because his selection of kexts seemed to work the best for my computer. And of coarse the most important thing was to repair the permissions in single user. I listed how to do that in another post just scroll down.

Another cool thing I learned was how to make a perfect copy of my leopard install. It's actually just one step: use ccc for leopard. Then I had a copy to play with in case I make a mistake. I now had a problem though. I had like three different Leopard install on three different partitions of my hard drive. So I learned about boot loader flags. This is really cool. You can get under the hood and tell your computer which partition to boot up from. In a real mac you just go to start up disk, but since this is a PC mac doesn't begin until the disk has already been selected so it basically doesn't work.

Thus boot flags. I now have my second partition boot up in verbose mode because I added some boot flags to the boot.plist of the first install. The first partition has to have an install on in order to tell the other drives what to do.

Here is my system profiler


Why Blog Was Made

I wanted to create a space to talk about my successes, failures and curiosities regarding the use of the MacOSX operating system on Intel-Based PC Hardware.

I would have just bought a new mac to replace my G4 Tower, but the cost of a mac pro is well over $2000.00 ! So I didn't want to get stuck with something like the mac mini which can't support dual monitors, or the imac which is just a stationary laptop. I wanted a true replacement for my powermac G4 and the only thing like it was the mac pro.

So when I found out that you can run the MacOS on a pc I was hooked. For the record I knew just about nothing when it comes to hacking and definitely knew nothing regarding PC's lol. I was able to purchase a pc equivalent to the intel imac 24 inch for about 500$. But unlike the imac I can upgrade and modify this computer all day long.

Asus P5W DH Deluxe fully working Tiger

My first Hackintosh was a pc I bought off of craigslist for $100. It was an Asus P4P800 with a penitium D something or other. It worked right out of the box using the Jas 10.4.8 install dvd. I was hooked once I saw the mac apple on the gray start up screen. Most things worked really well. It was so much faster than my G4 running apps like photoshop and protools, even though my G4 was upgraded to dual 1.6 ghz processor.
But the P4P800 is an 865 chipset and that didn't have drivers for video. So I couldn't get dvd's to play correctly. It didn't have Quartz Extreme or Core Image.

So I did my research and decided on the P5W DH Deluxe by ASUS. It seemed that it would last long enough for my needs. I got an xfx 7300 gs video card (pci extreem). I got a core2duo 6300. and 2 gigs of 800 ram. I had a couple of 180 sata drives laying around and I bought an apple compatible dvd burner from pioneer.

Well everything just worked and it was fast. I used the Jas 10.4.8 install dvd and then later updated to 10.4.9. That was a bit harder as I hadn't learned how to repair permissions for changing patched kernels in the Terminal. Here are the kernel repair commands for the terminal

"sudo -s (enter)"
"password (enter)"
"chmod 644 /mach_kernel (enter)"
"chown 0:0 /mach_kernel (enter)"

and for fixing permissions after changing out kexts ( a absolute must when using a hackintosh) I use these commands:

I would boot into single user mode. I do this by restarting the computer, then hit f8 when the darwin bootloader starts up (blinking little cursor up in the left hand corner). I then can enter "-s" to go into single user mode. The "-s" is a boot flag. These are really helpful things to learn here is a link to boot flags.

I also like to repair the kext cache so I would enter " -f " along with the "-s "

When it finishes loading I then make the volume writable.

This was very important, if I didn't make the volume writable the changes would not be made.

So I would enter "/sbin/fsck -fy "(enter)
Then I would enter "/sbin/mount -uw / "(enter)


"chmod -R 755 /System/Library/Extensions/* "(enter)
"chown -R 0:0 /System/Library/Extensions/* "(enter)

then I hit exit

I actually had to learn these commands for working on my leopard installation. When I was just using Tiger I would install two versions of the same Tiger. This would allow me to fix one with the other. I would just bounce from one install to the other to get all of my work done.

But once Leopard came out for some reason the diskutility wasn't repairing my permissions correctly so I had to learn how to fix them in in single user mode.